Choosing the right font can make your Word documents look clean, professional, and visually appealing. The default font in Word is Calibri 11 pt. While this is a perfectly fine font, you may want to change it up and make another font your new default.
Changing the default font allows you to set a new font that will automatically be applied to all new Word documents. This saves you time from having to manually format the font every time you create a new document.
In this simple tutorial, I’ll walk you through the steps to change the default font in Word across all your documents. Whether you want to use a common font like Arial or Times New Roman or go with something more unique, it’s easy to set your preferred font to be the new normal.
Step 1: Select the Font You Want As Your New Default
First, you’ll want to decide which font you want new documents to use automatically. Here are some good font options to consider:
- Arial – A very common, clean sans-serif font. Works well for many documents.
- Times New Roman – A popular serif font that’s great for formal documents.
- Garamond – A readable serif font with old-style appeal. Nice for printing.
- Calibri – Microsoft’s default font. A solid, safe option.
- Cambria – A serif font designed for on-screen reading.
Once you’ve picked the font you want, it’s time to make the change across Word.
Step 2: Open the Default Font Dialog Box
To set your new default font in Word, we’ll need to access the Default Font settings. Here’s how:
- Open any existing Word document or create a new blank document.
- Click the “Home” tab in the ribbon.
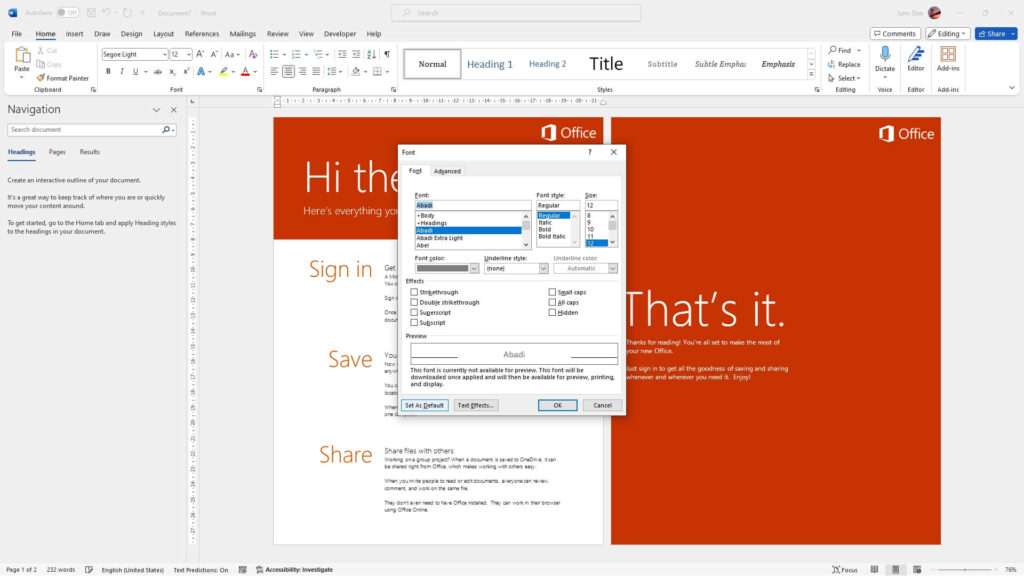
- Click the small arrow in the bottom-right corner of the “Font” section.
- Select “Set As Default” from the dropdown menu. This opens the Default Font dialog box.
Step 3: Select Your Chosen Font and Options
In the Default Font dialog box, you can choose the new default font for all document elements, including body text, headings, and more:
- Under “Font”, select your chosen font from the drop-down menu.
- For the font “Size”, choose the default size you want. 11 pt is standard.
- Under “Fonts for:”, check the box next to each document element you want to change. Make sure “Latin text” is selected as this is the main text.
- Click “OK” to save the changes.
Your selected default font will now be set!
Step 4: Confirm the Font Change in New Documents
To check that your new default font actually applied across Word properly:
- Open a new blank Word document.
- Select some text and make sure it shows the font, style, and size you selected.
- Create a new heading style. It should reflect the settings you chose as well.
If your new font is showing properly in new documents, then you successfully changed the default font in Word!
Now every new document will automatically use those font settings. You don’t have to manually format it each time.
Customizing Your Default Fonts Further
Beyond just the main Latin text font, you can dig deeper and customize default fonts for other elements:
- Headings – Have headings stand out by using a different font just for titles and headers.
- Asian Text – Choose a specific default Chinese, Japanese or Korean font.
- Complex Scripts – Change the font for right-to-left languages like Arabic or Hebrew.
To modify these separately from the main Latin text:
- Go back to the “Default Font” dialog box using the steps above.
- Check the boxes for the other elements you want to customize.
- Choose a different font, size, and formatting for each one.
Get creative with font defaults that work for the languages and purposes of your most common document types.
Reset Fonts Back to the Original Default
If you want to go back to the original default Calibri 11 pt setting later on:
- Return to the “Default Font” dialog box.
- Click the “Reset to default font” link at the bottom.
- Confirm by clicking “Yes”.
That will instantly change any custom default fonts you set back to Calibri across Word again.
Conclusion
With just a few clicks, you can choose new default fonts that automatically apply to all your Word documents. This little customization can save you time and give your documents a more cohesive, professional look.
So try out a new font like Arial or Garamond as your go-to. Or get creative with different defaults for headings and text elements. Changing the default font in Word is an easy way to update documents to your style.


