Adding images to Google Docs can make your documents more visually engaging. However, when you want to reuse those images elsewhere, it can be tricky to download them from Docs. In this article, I’ll walk you through the steps to easily save images from Google Docs in their original quality.
Prerequisites
To follow this tutorial, you’ll need:
- A Google account
- The Google Docs app or docs.google.com access
- The Google Keep note-taking app (optional)
I’ll be demonstrating on a Windows 10 PC, but these methods also work on Mac, Linux, Chromebooks, Android and iOS devices.
Method 1: Copy the Image to Google Keep
My favorite approach is to leverage Google’s own Keep note-taking service.
Here’s how:
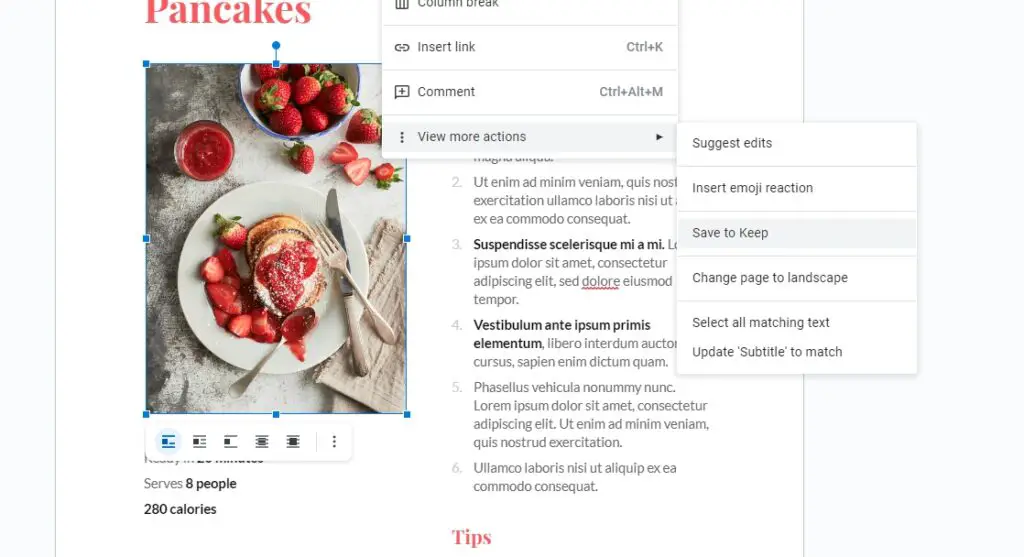
- Open your document and right-click the image you want to save.
- Select View more actions > Save to Keep. This copies the image to a new Keep note.
- Open Keep in a separate tab and locate the new note.
- Right-click your image there and pick Save image as.
- Choose a download location on your computer and hit Save.
That’s the fastest way to grab individual images without losing quality. Feel free to delete the Keep note when finished.
Method 2: Download the Doc as a Web Page
If you need to export several or all images from a Doc, use the built-in export:
- Open your Google Doc and go to File > Download > Web Page (.html, zipped).
- Unzip the downloaded file on your computer.
- Inside is your document as an HTML file. Open the “Images” folder within.
- Here are all pictures saved individually for you to keep.
This approach maintains full image quality. On the downside, photos are named generically like “image1.jpeg”.
Method 3: Publish to the Web
Similar to the export, you can also publish your document and then view it in Chrome:
- Go to File > Publish to the web.
- Copy the published link.
- Paste the link in a new Chrome tab and hit Enter.
- Right-click any image > Save image as to download it.
I’d only use this if the above options aren’t working for you.
Cropping Images in Google Docs
Once you’ve inserted images into your document, you may want to crop or resize them:
- Click an image to select it. Sizing handles will appear around the edges.
- Click and drag any handle to manually resize.
- Or go to Format options > Crop image to open cropping tools.
- Adjust the dotted lines over the area you want to keep.
- Click Apply cropping.
Image Positioning Tips
Where you place images relative to text impacts readability:
- In line with text: Images sit inline between paragraphs.
- Wrapping text: Text hugs the image sides instead of breaking it apart.
- Breaking text: Images sit alone between paragraphs.
Wrapping text around pictures usually looks best. Right-click an image and toggle Wrap text to test the formats.
Conclusion
And there you have it – three straightforward ways to export images out of Google Docs while maintaining their original quality and resolution.
The key options:
- Save to Keep: Fastest way to grab individual images
- Download as web page: Best for bulk exports
- Publish to web: Decent backup option
Just remember to check copyrights before reusing any photos elsewhere.
I hope this tutorial gave you the skills to easily save images from Google Docs for all your projects. Let me know in the comments if you have any other questions!


