Text boxes are useful for highlighting or isolating blocks of text in Word documents. By default, text boxes have a visible black border around them to differentiate them from regular text. However, you may want to remove this outline for a more seamless, blended-in look.
Removing a text box outline is easy to do directly within Word. In this tutorial, I’ll walk you through the quick steps to remove a border from around a text box in Word. I’ll also cover some customization options you have for modifying the text box style.
Select the Text Box
To start, you need to select the text box itself.
- Click inside the text box to place the cursor there. This selects the text box.
- Alternatively, click and drag to highlight the entire text box. A selection border will appear around it.
Once selected, you’ll see the Text Box Tools formatting tab appear on the ribbon. This has the formatting options specific to text boxes.
Remove the Outline
With the text box selected:
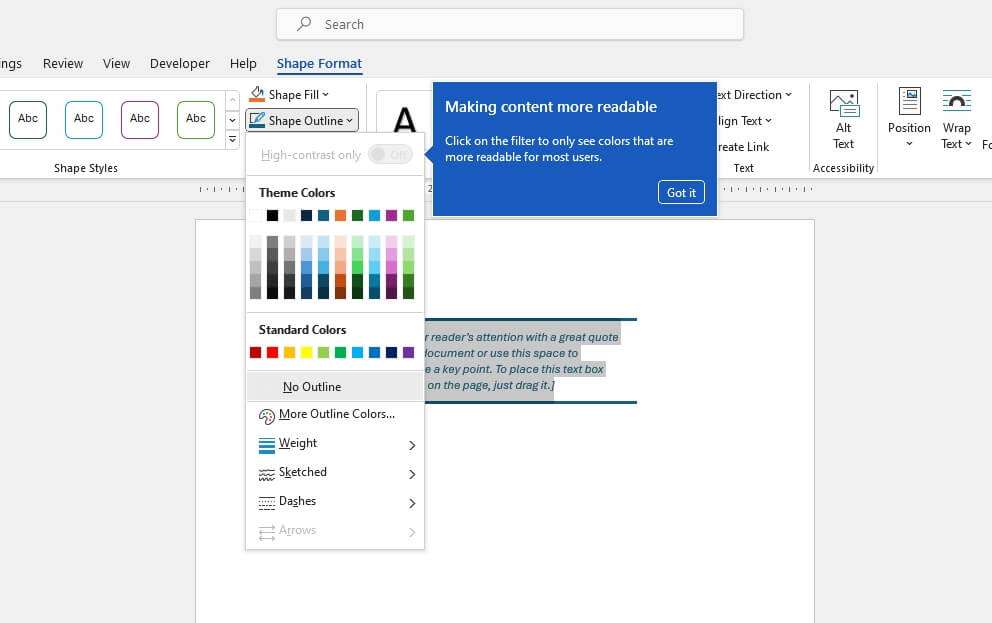
- Go to the Format tab on the ribbon (under Text Box Tools).
- Click Shape Outline.
- Select No Outline to remove the border.
The black outline border will immediately disappear, blending the text box into the document seamlessly.
Customization Options
Removing the outline entirely gives you a blank text box style to work with. But you can also customize the border style:
- Change border color: Select a different color from the Shape Outline dropdown to change the outline color. White or gray is popular for subtle borders.
- Change border width: Adjust the outline Weight between 0.25pt to 12pt to make it thicker or thinner.
- Change border dashes/style: Pick a dashed or dotted line under Dashes if you want an alternate style.
Use these options to tweak the text box style to your needs.
When Outline Doesn’t Disappear
Sometimes the outline might not disappear instantly when you select No Outline, usually if:
- Multiple text boxes are selected together
- The text box is linked or grouped with another object
- Wrap Text is set to anything but “In Line with Text”
Try selecting just one text box at a time and confirm text wrap settings if the outline persists.
Matching Text Boxes
When using multiple text boxes:
- Select all text boxes at once to change formatting together
- Hold CTRL and select to choose multiple text boxes
- Right-click > Format Shape to modify style
This ensures all text boxes match formatting.
Conclusion
Removing text box outlines in Word simply requires going to the Shape Format tab and selecting No Outline. Take a few minutes to eliminate borders from text boxes to seamlessly integrate them into documents and presentations.
Additionally, don’t forget about the other formatting options available to customize borders. Tweak the style, color and weight for subtle borders if desired.
With this quick trick, text boxes can blend right into surrounding content for a clean, professional look.


