Writing a book? You may be tempted to use Microsoft Word, but Google Docs is a great free alternative for formatting your manuscript. In this tutorial, I’ll walk you through how to set up Google Docs to format your book properly, including setting the correct page size, adding page numbers, creating a table of contents, and more.
Set the Page Size
The first step is to set the correct page size for your book. Here’s how:
- Open a new Google Docs document.
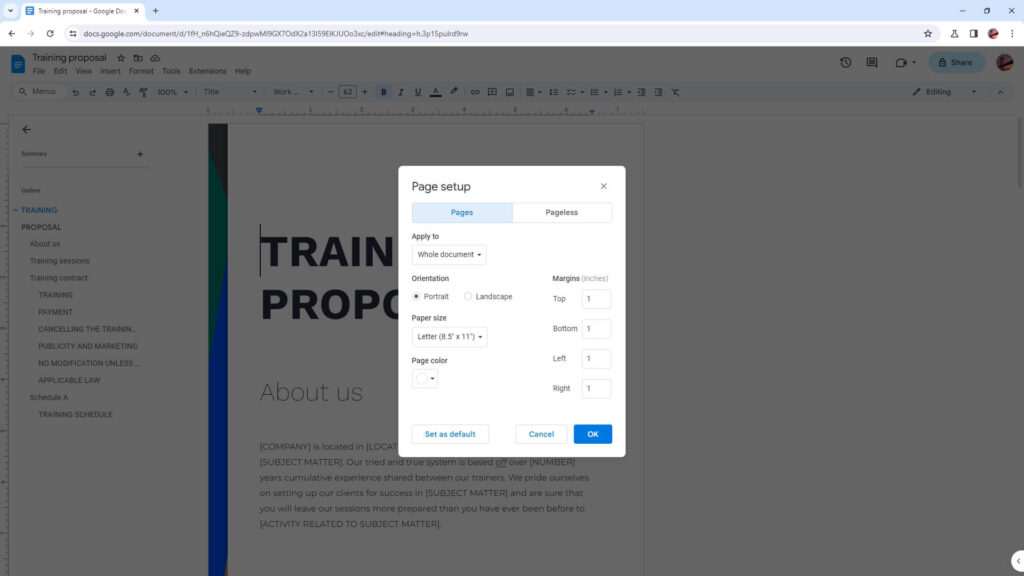
- Go to File > Page setup.
- Under Paper size, choose “Letter” for 8.5 x 11 inches. This is the standard book page size.
- Set all margins to 1 inch under Margins.
- Click Apply to save the changes.
Choose the Font
Most published books use 12-point Times New Roman or a similar serif font. Here’s how to set it in Google Docs:
- Highlight all the text in your document.
- In the toolbar, select the font drop-down and choose “Times New Roman”.
- Then choose 12-point font size.
This will set the font style and size for your entire document.
Add Page Numbers
Page numbers help give your book a professional, polished look. Here’s how to add them:
- Click Insert > Page number > Top of page > Plain number.
- Choose Right alignment and set the number format to start at 1.
- Click Apply to add page numbers starting from page 1, excluding the first page.
Tip: Add the page number in a header or footer so it appears on every page automatically.
Create Sections
Long books are usually divided into parts or sections. Here’s how to add sections in Google Docs:
- Place your cursor where you want the new section to start.
- Click Insert > Section break.
- Choose the “Next Page” option.
- Type a section heading after the break, like “Part I” or “Chapter 1”.
Repeat this for each new section in your book.
Build a Table of Contents
A table of contents makes it easy for readers to jump around your book. To create one:
- Click Insert > Table of contents.
- Choose the first automatic table of contents style.
- Click OK.
This will insert a table of contents at your cursor pulling from any headings in your document.
Add Headers and Footers
Headers and footers give you space to display information like the book title and page numbers.
To add a header:
- Click Insert > Header > Blank.
- Type your header text, like the book title.
To add a footer:
- Click Insert > Footer > Blank.
- Type footer text, like the page number or author name.
Use Heading Styles
Creating distinct heading styles for chapter titles, sections, subheads, etc. improves formatting and ensures they are included properly in your table of contents.
To create a heading style:
- Select the text you want to style.
- Click the Normal text drop-down arrow.
- Choose Heading 1, Heading 2, Heading 3, etc.
- Click Apply to save the style.
Repeat this process to style all headings in your document.
Add Images and Charts
It’s easy to spice up your book by adding images and charts. To insert an image:
- Click Insert > Image.
- Choose Upload from computer to add an image from your PC.
- Set image wrapping, alignment, and size options.
Follow the same general steps to insert a chart or diagram.
Use Page Breaks
Page breaks explicitly start new pages and can prevent widows/orphans (single words stranded on a new page).
To add a page break:
- Place your cursor where you want the new page to start.
- Click Insert > Page break.
Check Formatting Issues
Before you export your book manuscript, it’s smart to check for any lingering formatting issues:
- Run a spell check
- Review table of contents
- Confirm page numbers appear correctly
- Check headers, footers and page breaks
- Verify no widows/orphans
- Confirm images sized and placed properly
Fix any issues before exporting your document.
Export Book File
When your formatting looks perfect, it’s time to export your Google Doc as a book file.
- Click File > Download > Microsoft Word (.docx) to save the file as a Word document.
Now your manuscript is ready for publishing! You can upload it to an eBook publisher or print service.
Recap
Formatting a book in Google Docs is straightforward once you know the right steps:
- Set page size
- Choose font style and size
- Add page numbers
- Create sections
- Build table of contents
- Add headers/footers
- Use heading styles
- Insert images/charts
- Add page breaks
- Resolve formatting issues
- Export .docx file
With these tips, you can transform Google Docs into a book formatting tool on par with Word. So next time you write a book, consider using Google Docs to save time and money.


