Tables are a great way to organize and present data in Google Docs. They allow you to arrange information in rows and columns, making it easy to read and compare.
In this article, I’ll walk you through the steps for creating and formatting tables in Google Docs. Whether you need a basic table or something more complex, these tips will help you make professional-looking tables with ease.
Insert a Table
Inserting a table in Google Docs is simple. Just follow these steps:
- Open a document and place your cursor where you want the table to be inserted.
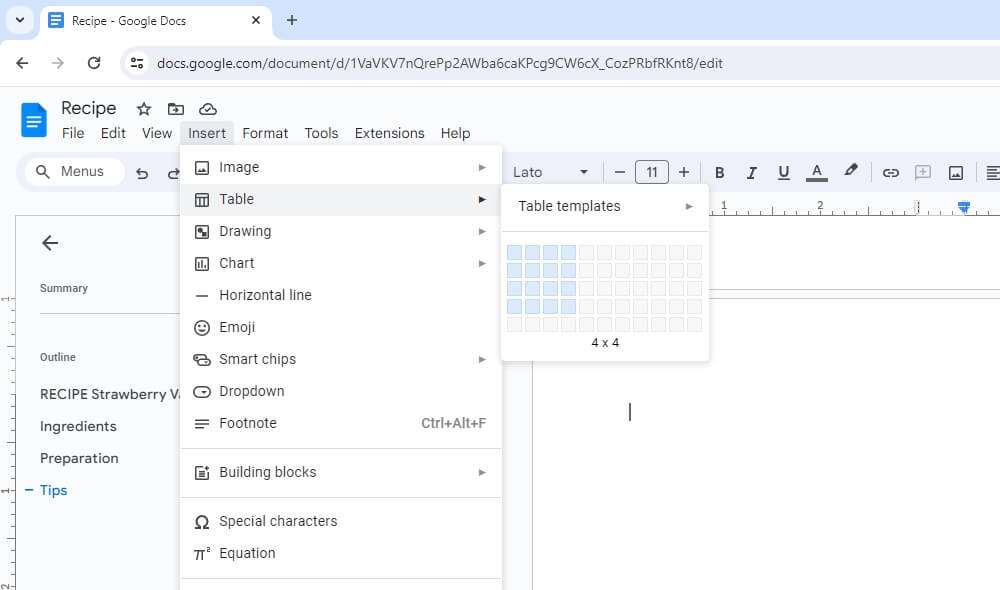
- Click Insert > Table on the menu bar.
- Select the number of rows and columns you want for your table by hovering over the grid that appears.
- Click the square representing the size of the table you want inserted.
A table with the specified rows and columns will now appear in your document.
Add or Delete Rows and Columns
Once your table is inserted, you may need to adjust its size by adding or removing rows and columns. Here’s how:
To add a row or column:
- Click within the table and select Table > Insert row above or Insert row below to add rows. Use Insert column left or Insert column right to add columns.
To delete rows or columns:
- Click within the table, select the row/column header, and choose Table > Delete row or Delete column.
Merge and Split Cells
You can combine table cells for things like making headings that span multiple columns:
- Select the cells you want to merge.
- Click Table > Merge cells.
To unmerge the cells, select the merged cell and choose Table > Split cells.
Change Text Alignment
To customize the alignment of text within the table cells:
- Select the cells you wish to change.
- Click the Align left, Align center, or Align right alignment buttons on the toolbar.
Add Borders and Shading
Borders and shading can help organize your table data:
- Select the cells you want to adjust.
- Click Table > Table properties to open formatting options.
- In the Table properties box, adjust borders and background colors for the selected cells.
Adjust Row Height and Column Width
To set precise column widths and row heights:
- Select the columns/rows you want to adjust.
- Open the Table properties box.
- Enter the desired Width and Height in inches.
For quick adjustments, you can also drag the column and row borders to resize.
Sort Table Data
When you have textual or numerical data in your table, you can instantly sort the contents:
- Select the column you want to sort by.
- Click Table > Sort sheet by column.
- Pick either A-Z or Z-A sorting.
This will instantly reorder the table based on the values in that column.
Convert Text to Table
If you already have text content you want to convert to a table:
- Select the text and click Table > Convert text to table.
- Separate text into columns using commas or paragraph breaks.
- Adjust the table dimensions that appear.
The text will be neatly arranged into rows and columns.
Format the Table
To access options for formatting the overall table:
- Click anywhere in the table and select Table > Table properties.
- Choose options like borders, alignment, and spacing.
Use these settings to customize the complete table at once instead of formatting individual cells.
Add Charts or Images
You can insert charts or images that visualize your table data:
- Select the cells containing data you want to chart.
- Click Insert > Chart to visualize data.
- Click Insert > Image to add a relevant photo or diagram.
Integrating visuals is a great way to enhance tables in your documents.
Use Keyboard Shortcuts
Keyboard shortcuts can help you navigate and edit tables more efficiently:
- Tab – Move to the next cell
- Shift+Tab – Move to previous cell
- Alt+click – Select an entire column
- Shift+Spacebar+click – Select an entire row
- Ctrl+Alt+5 – Split merged table cells
Take the time to learn shortcuts for your frequent table editing tasks.
Convert Table to Text
To convert an existing table back into text:
- Click anywhere in the table.
- Select Table > Convert table to text.
The rows and columns will be converted into text separated by commas or paragraphs.
Link Table Data to Sheets
If you use Google Sheets, you can insert tables linked to your spreadsheet data. This allows tables to update automatically when sheet data changes. Learn more about linking tables between Docs and Sheets.
With these handy tips, you’ll be inserting and formatting complex tables like a pro in Google Docs. Take your time to experiment with the various options covered here. Proper use of tables can make your documents much easier to organize and understand.


