Adding lines to your Microsoft Word documents can help visually organize and separate content. Lines act as visual dividers to break up sections, highlight key points, or draw attention to important text.
In this tutorial, you’ll learn several easy methods for drawing lines in Word on both Windows and Mac. We’ll cover how to:
- Draw straight lines with the Line Shape tool
- Create dotted lines, dashed lines, and arrows
- Customize line color, thickness, and style
- Make perfectly horizontal or vertical lines
- Use keyboard shortcuts to quickly add lines
- Employ tables and borders for flexible line drawing options
So whether you’re creating reports, flyers, letters, or any other documents, this tutorial will teach you how to effectively use lines for better visual layouts. Let’s get started!
Method 1: Draw Lines With the Shape Tool
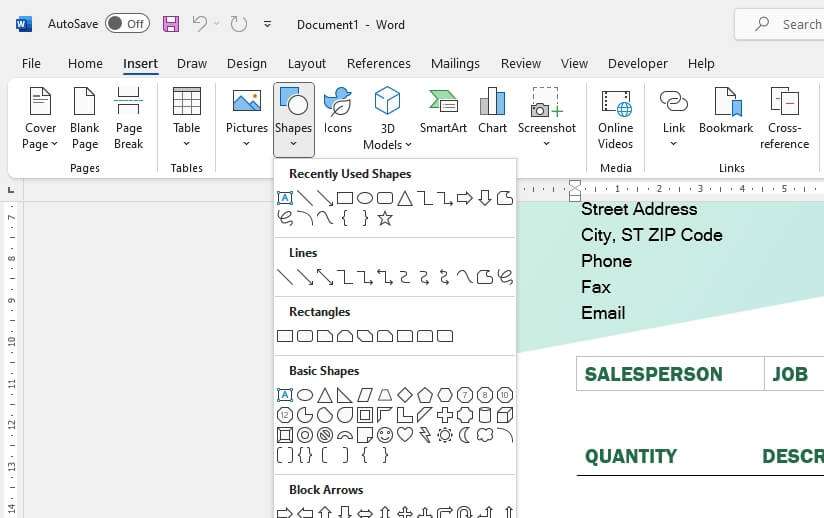
The fastest way to draw a line is using the Shape tool. Here’s how:
- Click the Insert tab in the Word ribbon
- Select Shapes > Lines to open the line shape menu
- Choose your desired line type like a straight line, arrow, curve, etc.
- Click and drag on the page to draw the line. Release the mouse when finished.
Tip: Press and hold the Shift key while dragging to make perfectly straight horizontal or vertical lines.
Once drawn, the line will remain selected. Use the Format tab to customize thickness, dashes, color, arrowheads, and more.
The Shape tool method works great for quickly adding simple lines for visual separation. Next we’ll look at more advanced options.
Method 2: Draw Dotted and Dashed Lines
The Line Shape tool also lets you create dotted and dashed lines, which are useful as visual dividers when you don’t want a solid line:
- Draw a line using the Shape tool
- Select the line to view the Format tab
- Click Shape Outline > Dashes and select your dash type
- Dotted uses small dots
- Dashed has gaps between strokes
- Adjust dash size and more in the Format Shape pane
Customize thickness, color, and line style here too. This makes it easy to create lines that fit your document’s visual theme.
Method 3: Use Borders and Tables for Flexible Lines
Borders and tables open up more possibilities for drawing lines in Word. Unlike the Shape tool, borders can stretch to fill the page vertically or horizontally. This lets you create flexible line dividers that resize automatically as you add or remove text.
Use Borders
- Highlight the paragraph where you want a line
- On the Home tab select Paragraph > Borders and Shading
- Pick border settings like color, thickness, and line style
- Choose to add borders above, below, left, right, or a combination
Since borders attach to paragraphs and tables, they’re great for keeping lines with related content.
Use Table Gridlines
- Insert a one-cell table
- Select the entire table
- Open the Table Design tab
- Check the box for Banded Rows and Columns to show gridlines
- Adjust line width, color, and style in Table Properties
Tables make it easy to divide pages into sections with lines. Adjusting column widths resizes lines automatically.
Method 4: Quickly Add Lines With Keyboard Shortcuts
Drawing lines with the mouse works, but gets tedious. Save time by using these handy keyboard shortcuts instead:
- Ctrl + Shift + Plus (+) for horizontal line
- Ctrl + Enter for page break line
- Ctrl + Shift + Minus (-) for dotted line
The keyboard shortcuts insert the most common line types on demand with just a couple of keystrokes. Give them a try!
Tips for Using Lines Effectively
Now that you know how to add lines in Word, let’s discuss some best practices:
- Use solid lines sparingly to keep documents clean and readable
- Dotted or dashed lines stand out while minimizing visual clutter
- Match line styles to existing theme colors and fonts for consistency
- Draw reader focus with thick lines under key headings
- Align multiple lines on facing pages to visually link content
And that’s it! With these simple methods, you can start drawing lines to add visual organization and flair to all your Word documents.
Lines help guide readers through your content in a structured way. Use them intentionally to call attention to important information.
Thanks for reading this tutorial on drawing lines in Word. Now pick up the pen tool and start dividing your documents like a pro!


