When working with Microsoft Word documents, especially in a business or office setting, it can be very useful to know who the original author of a document is. Whether you inherited a document and need to follow up with the creator or want to verify authorship before presenting a document more widely, Word has built-in tools to help you identify document creators.
In this tutorial, I’ll walk you through the simple steps to see basic author details, view extended author metadata, and inspect document revisions to trace edits back to different authors. Let’s get started!
Check Basic Document Properties
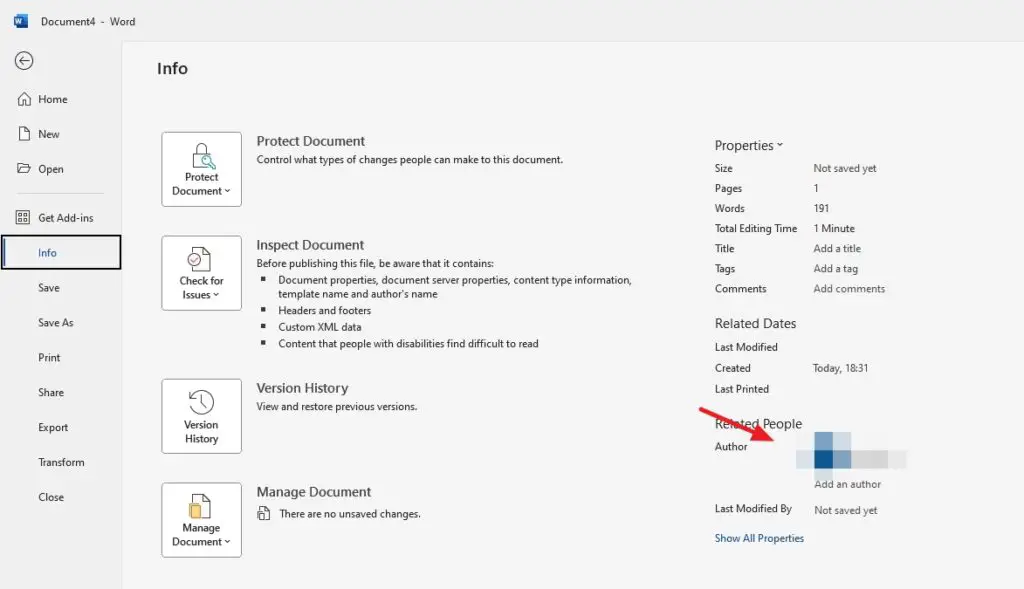
The easiest way to see who created a Word document is to view the basic document properties:
- Open the Word document in question.
- Select the File tab.
- Choose Info from the left sidebar.
- View the Author field.
This will display the author name that was entered when the document was originally created. Depending on the author’s Word settings at the time, you may see a full name, an email address, or perhaps just a computer username.
So this method gives you a quick way to view basic authorship details, but it’s fairly limited. Next I’ll show you how to access more detailed metadata.
Inspect Document Metadata
For more comprehensive authorship metadata that Word documents can store, we need to view the full document properties:
- With your document open, select the File tab.
- Choose Info from the left sidebar.
- Click the Properties dropdown and choose Advanced Properties.
- Select the Summary tab.
In the Author field here, you’ll again see the primary author name. But by selecting other tabs like Custom and Statistics, you can also identify:
- The original creator if ownership was transferred
- The various contributors who edited the document
- Exact timespans and durations of author edits
So by poking around here, you can start to piece together a detailed edit history of the document: who created it originally, who has contributed since, and who spent the most time editing it.
Trace Edits via Revision Marks
The most forensic way to attribute different sections of a Word document to various authors is to inspect the revision marks:
- Go to the Review tab.
- Click Track Changes and choose All Markup.
This will turn on revision marking and show you every edit made by each author. You’ll see clearly who inserted and deleted which text.
To make life easier, restrict the timeline to when the document was created:
- Go back to Review > Track Changes.
- Click the dropdown arrow next to All Markup.
- Choose Since I Last Saved.
Now you’ll only see major revisions since the document was first created. Double click on any edit to jump straight to it. Or scroll through systematically to analyze how the content developed over time.
By combining basic author properties, detailed statistics, and the revision history, you can feel confident attributing different components to different authors.
Remember Document Anonymity
One final tip: just because you can inspect Word document properties and revisions, doesn’t always mean you should. If a document was shared with you anonymously or in confidence, respect that by not digging into authorship metadata without permission.
But in most business cases, identifying contributors is perfectly reasonable for accountability. Just make sure to follow any data privacy guidelines your company has in place.
Let’s Recap…
Now you know several techniques to see who created a Microsoft Word document:
- Check basic author info in File > Info
- View detailed metadata in File > Info > Properties
- Inspect revision marks to trace edits
- But respect anonymity if required
So whether you’re trying to give credit, assign ownership, or track changes, you can leverage these tools to attribute different parts of a document to various authors.
I hope this tutorial gives you the confidence to identify document creators accurately going forward. Let me know if you have any other questions!


