Adding borders to your Microsoft Word documents can make them look more visually appealing and professional. Borders can help highlight important sections, make text stand out, or just add some flair to an otherwise plain document.
In this tutorial, I’ll walk you through the steps for adding different types of borders in Word.
Types of Borders
There are a few different types of borders you can add in Word:
- Page borders – These borders go around the entire page. You can choose for them to go on all pages or just certain pages.
- Text borders – Add a border around a paragraph, selection of text, table, image, etc.
- Table borders – Specifically borders within tables, allows you to customize the table border appearance.
Keep reading to learn how to add each of these borders.
Adding a Page Border
To add a border that goes around the entire page:
- Go to the Design tab
- Click Page Borders
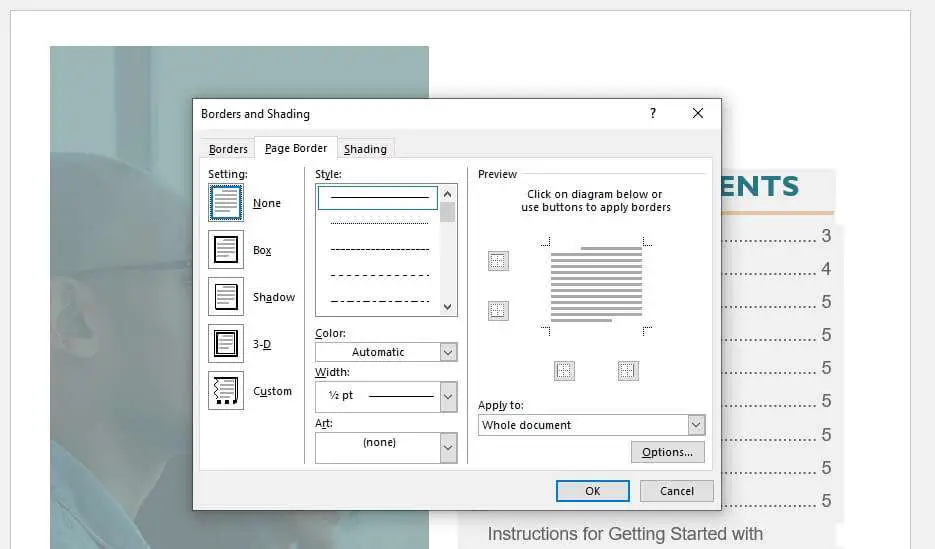
- In the Borders and Shading dialog box, click the Page Border tab
From here, you have several customization options:
- Setting – Choose the border style like Box, Shadow, 3-D, or create a custom border
- Style – Select a line style like solid, dashed, dotted lines
- Color – Pick the color for your border lines
- Width – Make borders thicker or thinner
- Art – Add a graphic element to the page border
You can also click Options at the bottom to customize the distance from the edge of the page.
When you have your desired page border setup, click OK to apply it.
Adding Borders to Text
To add a border around specific text:
- Select the text
- Go to the Home tab
- Click the Borders button (under Paragraph)
- Select the border style you want
Or for more customization options:
- Select the text
- Click the Borders button arrow
- Click Borders and Shading
- Customize border appearance
- Click OK
You can apply text borders to paragraphs, selected words, lines, or entire text boxes. Get creative with different styles!
Adding Table Borders
Borders within tables allow you to customize the appearance of table gridlines.
To add borders to a table:
- Click inside the table
- Go to the Design tab
- Click Borders and select a border style from the menu
Or for more options:
- Click inside the table
- Go to Table Design > Borders and Shading
- Customize border appearance
- Click OK
Final Touches
- View your document in Print Preview mode to see how the borders will look on paper
- Adjust page setup options if the borders are cutting off on the edges
- For a consistent look, create and apply border styles that can be reused
And that’s it! With these steps you can start adding borders to enhance the design of your Word documents. Borders are a great way to make sections stand out or give your documents some personality!
Let me know if you have any other questions!


