Adding columns in Google Docs is a great way to organize and format your documents. Whether you want to create a newspaper layout, comparison chart, or visually appealing report, columns help add structure and improve readability. In this guide, I’ll walk you through the steps for adding and customizing columns in Google Docs on both desktop and mobile.
Getting Started with Columns
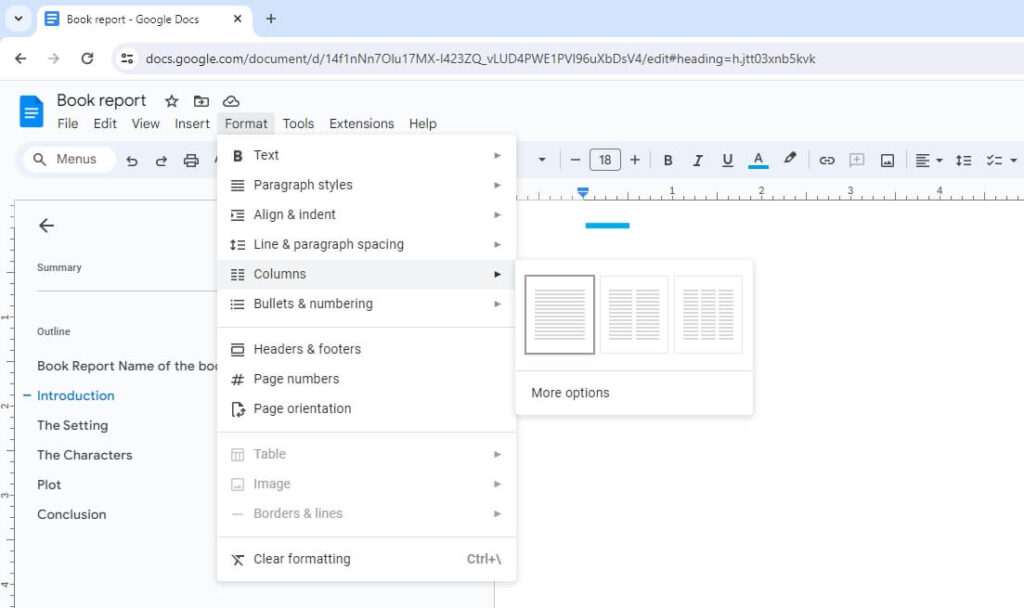
Adding columns in Google Docs is straightforward:
- Open a document and select the text you want to put into columns
- Click Format > Columns in the toolbar
- Choose the number of columns you want: one, two, or three
By default, Google Docs will fill the first column from top to bottom before adding content to the next column.
On mobile devices, the columns feature is not available in the Google Docs app. However, you can still access all your documents through the Google Drive app.
Customizing Columns
You have a few options for customizing the look of columns:
- Adjust spacing between columns: Click and drag the grey vertical bar in the ruler
- Add a vertical line between columns: Toggle on the “Line between columns” switch in the Columns dialog box
- Adjust width of columns: Click and drag column dividers in the ruler
To access these options:
- Select your columns and go to Format > Columns
- Click More options
- Make adjustments and click Apply
Tips for Working with Columns
Here are some of my top tips for effectively using columns:
- Use columns for comparisons – Lists of pros/cons, specs of products, etc.
- Improve readability with newspaper-style columns
- Organize long blocks of text by section
- Align images alongside text columns
- Use column breaks to control where columns start and end
On wider pages, two columns usually provides the best balance. On narrower pages, one column is best.
Adding and Removing Columns
You can add or delete columns in Google Docs tables as well:
- To add a column, right-click an existing column and choose Insert column left/right
- To delete a column, right-click the column and select Delete column
On Mac, ctrl-click instead of right-click.
When you add a column, the new column will be inserted next to the column that was clicked on. Rows can be added or deleted using the same method.
Troubleshooting Columns
If columns aren’t behaving as expected, check that:
- The document is using page layout rather than plain text format
- Column breaks have not been inserted accidentally
- Table cells are not merged across columns
To revert text to a single column, select the text, go to Format > Columns and choose the single column option.
Final Thoughts
Adding columns gives you more control over document layout and design in Google Docs. Take some time to experiment with columns for different purposes to see how they can improve your documents.
As you get the hang of it, columns become second nature to add and adjust. With the steps in this guide, you’ll be formatting text into organized columns in Google Docs like a pro.
Let me know in the comments if you have any other questions! I’m happy to help explain anything further.


