Microsoft Word provides a checkbox feature that allows you to insert interactive checkboxes into your Word documents. These checkboxes are useful for creating to-do lists, questionnaires, forms, and other documents where you want the ability to tick items off as completed.
Adding checkboxes in Word is easy once you know where to find the option. This article will walk you through the entire process step-by-step.
Step 1: Showing the Developer Tab
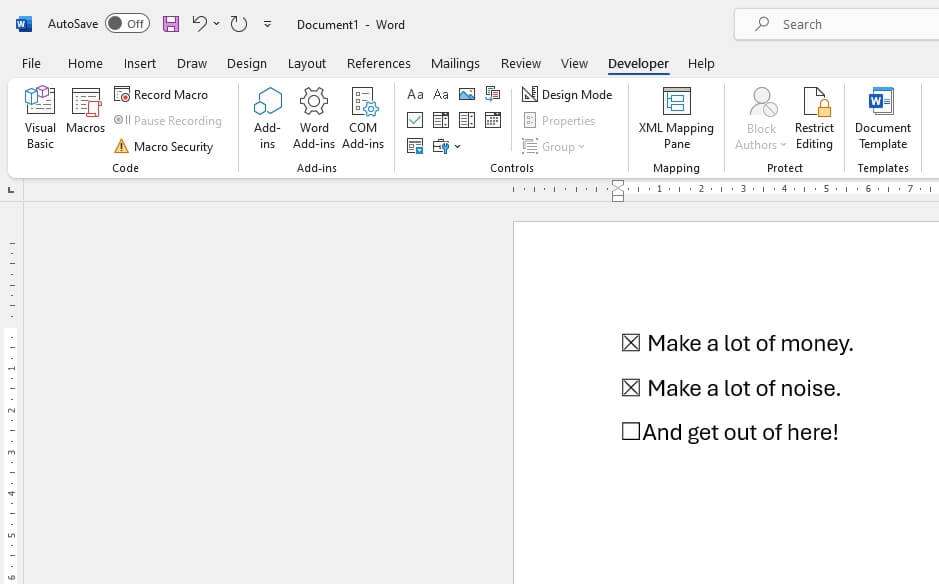
Before you can begin inserting checkboxes, you first need to make sure the Developer tab is displayed in your Ribbon. The Developer tab is where you’ll find the Checkbox Content Control button for adding checkboxes.
By default, the Developer tab is hidden in Word. Here’s how to show it:
- Click the File tab and select Options.
- From the left pane, click Customize Ribbon.
- Under Main Tabs, make sure there is a checkmark next to Developer.
- Click OK.
You should now see the Developer tab displayed in your Ribbon.
Step 2: Inserting a Checkbox
With the Developer tab now visible, adding a checkbox is very simple:
- Place your cursor where you want the checkbox to be inserted.
- On the Developer tab, click the Checkbox Content Control button.
A checkbox will be inserted where your cursor is placed. That’s all there is to adding a basic checkbox!
You can insert as many checkboxes as you need this way. Simply place your cursor and click the Checkbox Content Control button to add more.
Step 3: Customizing the Checkbox
After inserting a checkbox, you may want to customize its size, color, behavior, and more. Here are some checkbox customization options:
- To resize the checkbox, click it and drag the sizing handles to make it larger or smaller.
- Right-click the checkbox and select Properties to open the Content Control Properties dialog box. Here you can:
- Change the color of the checkbox border and checkmark.
- Make the checkbox checked or unchecked by default.
- Clear the checkbox after printing the document.
- And more.
- You can also right-click the checkbox and select Size to choose from preset size options.
Customizing your checkboxes allows you to match their appearance to your document design.
Copying and Pasting Checkboxes
Manually inserting each checkbox one-by-one can become tedious. An easier way is to copy and paste checkboxes:
- Insert a checkbox and customize its size, color, etc.
- Right-click the customized checkbox and select Copy (or press Ctrl+C).
- Place your cursor where you want the next checkbox.
- Right-click and select Paste (or press Ctrl+V) to paste the copied checkbox with all the same customizations.
This copies your checkbox like a stamp, allowing you to quickly replicate it as many times as needed.
Creating Checkbox Lists
Once you’ve inserted all your checkboxes, you’ll want to organize them into an easy-to-read list.
Here’s how to format checkboxes into a list:
- Press Enter after each checkbox to move to the next line.
- Insert a couple of tabs after each checkbox before typing the list text.
- The tabs indent the text and align it properly under the checkbox.
- To add a paragraph break instead of a single line break, press Shift + Enter after the list text and checkbox.
Properly aligning your text makes your checkbox list simple to view and use.
Here’s an example of a basic checkbox list with proper alignment:
- [ ] Buy groceries
- [ ] Pay bills
- [ ] Schedule appointments
Converting Existing Lists to Checkboxes
If you already have a bullet point list you want to convert to interactive checkboxes, there’s no need to retype everything. You can easily transform an existing list:
- Select all the list items you want to convert.
- On the Developer tab, click the Checkbox Content Control button to insert a checkbox.
- With all items still selected, right-click and select Paragraph.
- Under Indents and Spacing, choose Hanging from the drop-down menu.
- Click OK.
This will insert a properly-formatted checkbox at the beginning of each selected list item. The entire process takes just a few clicks!
Printing Documents with Checkboxes
When you print documents containing checkboxes, you may notice some differences from how the checkboxes appear on screen:
- Checked boxes include the checkmark when printed, so readers can see their status even on paper.
- Unchecked boxes print with the box only – no checkmark.
- If the checkbox properties are set to clear after printing, they will all print unchecked regardless of their status.
So printed checkboxes accurately reflect their status at the time of printing. Just be aware that any changes made to the checkboxes after printing won’t be reflected on paper.
Exporting and Saving as PDF
When exporting or saving your Word document containing checkboxes as a PDF file, the checkboxes will be converted to standard PDF checkboxes.
This retains their interactivity and capability to be checked/unchecked directly in the PDF viewer.
The appearance and behavior of the checkboxes should remain the same as in your Word document. Just note that after export, the checkboxes can no longer be edited or customized unless the PDF is converted back into an editable Word document.
In Summary
That covers the main methods for working with checkboxes in Word documents. Here’s a quick summary:
- Display the Developer tab to access the checkbox features.
- Insert a checkbox with the Checkbox Content Control button.
- Customize appearance and behavior through the checkbox properties.
- Copy and paste checkboxes to duplicate pre-formatted ones.
- Use tabs and line breaks to transform checkboxes into organized lists.
- Convert existing lists to interactive checkboxes.
- Understand how checkboxes print and export to PDF.
With these tips, you should now feel comfortable adding checkboxes to Word documents and using them to enhance your lists, forms, and other materials needing interactivity.
So give it a try and see how checkboxes can improve your business documents!


