Double spacing refers to having two spaces between words instead of the standard single space. While double spacing was common in the days of typewriters, it is no longer necessary with modern word processors and can make text more difficult to read. Thankfully, stopping double spaces in Microsoft Word is easy. Here’s how to do it.
Identify Double Spacing
Before removing double spaces, you first need to identify where they exist in your document. Here are two ways to check for double spacing:
Scan Visually
Carefully look through your document for extra space between words. Double spaces will have a more exaggerated gap compared to the normal spacing. Slowly read through each line to spot any irregular spacing.
Use Find and Replace
- Press Ctrl + H to open the Find and Replace dialog box
- Click the “More >>” button to show additional options
- Check the “Use wildcards” box
- In the “Find what” field type:
..(two periods) - Leave the “Replace with” field blank
- Click “Find Next” to jump to each double space
The two period wildcards will find every instance of two spaces in a row.
Remove Double Spacing
Once you’ve identified unwanted double spacing, eliminating it is simple:
For Individual Lines
- Click anywhere in the line with a double space
- Press backspace once to delete the extra space
For the Entire Document
- Press Ctrl + H to open Find and Replace
- Type two periods
..in “Find what” - Leave “Replace with” blank
- Click the “Replace all” button
This will instantly remove every double space at once.
Adjust Spacing Defaults
To prevent double spacing from accidentally being added again, you can change the default spacing settings:
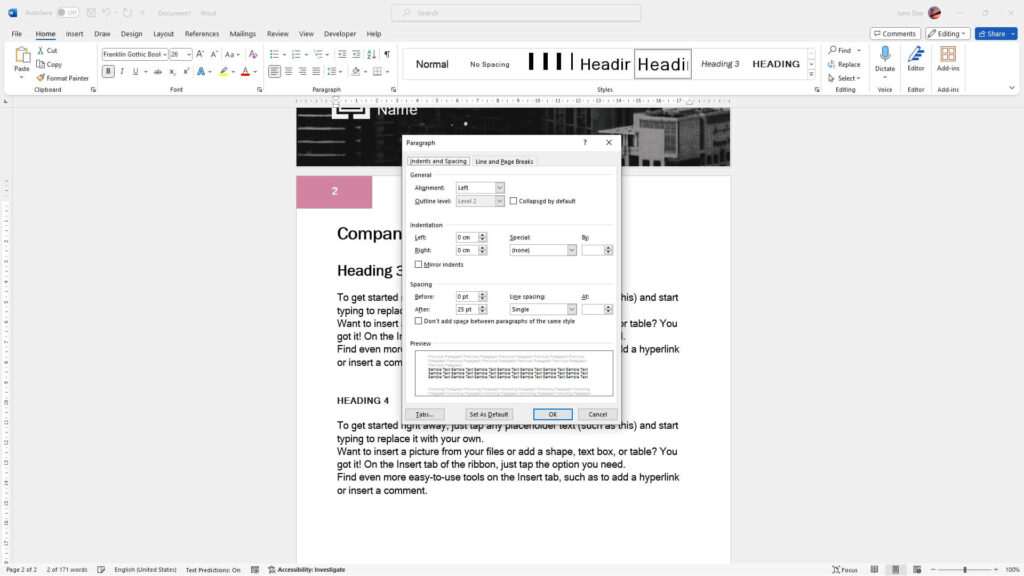
- Click the dialog box launcher in the bottom right corner of the “Paragraph” section on the Home tab
- Under “Spacing” change “Before” and “After” to 0 pt
- Change “Line spacing” to “Single”
- Click “OK”
Now any new typing will default to single spacing.
Create a Macro
For frequent double space removers, save the Find and Replace action as a macro for quick access:
- Click the “View” tab then “Macros”
- Select “Record macro”
- Name the macro something like “Remove Double Spaces”
- Click “Replace all” with
.and..as described above - Click stop recording and save the macro
- To use the macro later, click “View” then “Macros” and select it from the list
Running the saved macro will automatically remove all double spaces in one click!
Before Printing
Always do one final scan before printing or sharing your document to catch any last double spacing:
- Visually review each line
- Use Ctrl + H to run the Find/Replace again
- Check the default spacing settings
Following these steps will ensure no double spaces make it to the final version.
Stopping unnecessary double spacing is easy once you know what to look for. By adjusting your defaults, creating macros, and doing final checks, you can permanently eliminate this common formatting issue from Microsoft Word. Your documents will instantly become more readable and professional looking.


