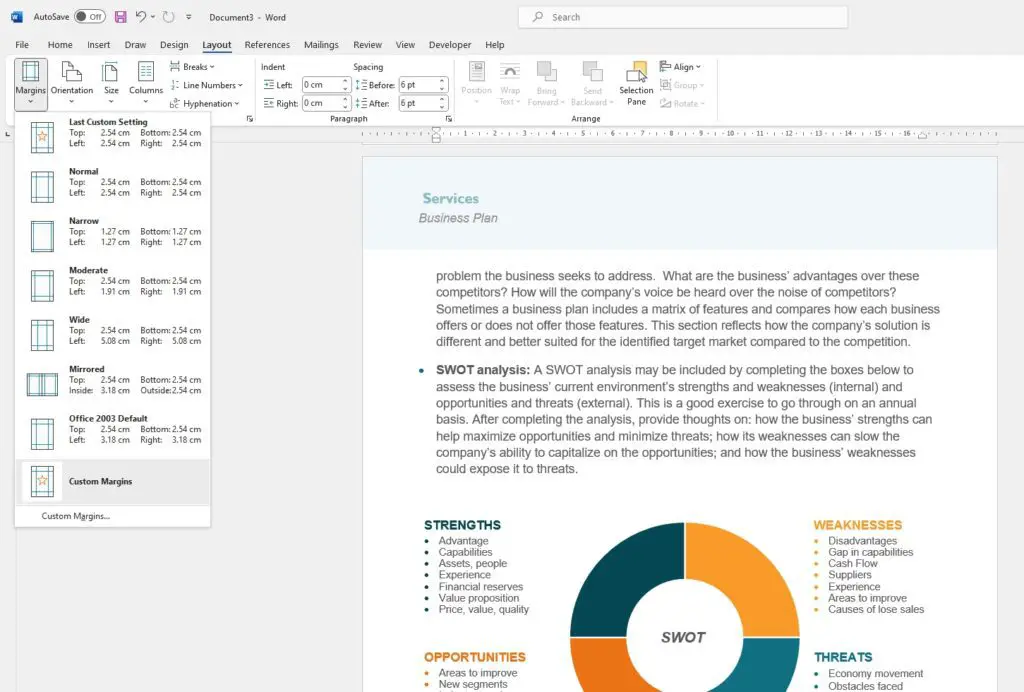
Setting one-inch margins in Microsoft Word is easy and ensures your documents look professional. Uniform margins create a clean frame around your content and improve readability.
Why Set One-Inch Margins
One-inch margins are the standard for most documents. They provide adequate whitespace without occupying too much of the page. Narrower margins can make text feel cramped, while wider margins waste paper and leave too much empty space.
One-inch margins also leave room for binding documents. If you plan to bind pages together, the extra margin space ensures text does not get obscured.
Using uniform margins keeps your documents looking consistent and polished. It’s a small formatting change that makes a big visual impact.
Set Margins for an Existing Document
To set one-inch margins for an open Word document:
- Click the Layout tab on the ribbon
- Click Margins > Custom Margins
- In the menu that appears, enter 1 inch for Top, Bottom, Left, and Right margins
- Click OK
The margins will adjust automatically throughout your document. This method changes margins for the entire document at once.
Tip: Pay attention to the Apply to dropdown menu. Choose Whole Document to change margins everywhere. Select This Point Forward to only alter margins from the cursor’s position onward.
Change Default Margins
Modifying default margins ensures any new document you create opens with one-inch margins automatically.
To set a new default in Word:
- Click the Layout tab
- Click Margins > Custom Margins
- Enter 1 inch for all margins
- Click the Set As Default button
- Click Yes to confirm
Now when you create a new document, it will open with one-inch page margins already set. This saves you time and effort compared to updating margins individually for each file.
Note: If you later want to revert to the original default margins, simply repeat these steps but enter 1.25 inches on the Left and Right margins.
Adjust Margins Visually
You can also adjust margins quickly using your mouse and the ruler guide at the top of the document window.
To change margins this way:
- Hover near the top or side ruler until the cursor changes to a double-headed arrow
- Click and drag margin lines inward or outward to desired positions
- Repeat on the other margins
This method provides a visual reference as you customize margins. However, the ruler method only alters margins on the current page. Use the other techniques to change margins document-wide.
Set Exact Margins in Centimeters or Inches
When setting custom margins, you can enter values in inches or centimeters. Pay attention to the units dropdown menu next to each margin field:
Dropdown menu to change margin units
Choose inches or centimeters depending on your preference. Just be sure to enter measurements in the units selected here.
If you need specific centimeter margins, use the conversions:
- 1 inch = 2.54 centimeters
- 2.5 centimeters = 1 inch
So 2.5 cm all around would equal 1 inch margins.
See Margins as You Edit
While editing documents, toggle the View Gridlines setting to see page margins, columns, and other formatting guides:
Home tab > Paragraph section > Show/Hide button > Gridlines
The grid view adds dotted lines marking the margins and other boundaries. This helps visually confirm margins as you format and edit documents.
Remember Other Layout Settings
Margins play an important role in page layout and readability, but they are just one piece of the formatting puzzle. As you set margins, consider other options like:
- Page size: The dimensions of the page like standard 8.5×11 in.
- Page orientation: Portrait or landscape layout.
- Columns: Documents can have multiple columns of text.
- Line spacing: The space between lines of text.
- Fonts and sizes: Choices that impact the length of content lines.
Adjust these settings in harmony with margins to craft professional, polished Word documents.
And that’s it! With these simple steps, you can set one-inch margins in Word to give your documents the perfect layout. Consistent margins prevent text from looking cramped or becoming obscured during binding. It’s a small change that makes a big difference.


