Cropping an image means trimming away unwanted outer areas to highlight a specific part of the image. You may want to crop images inserted into Microsoft Word for several reasons:
- Focus attention on the key subject by removing distracting background elements
- Reduce file size by deleting unnecessary areas and improving load times
- Improve composition by tightening framing around essential items
Fortunately, Word provides user-friendly built-in tools to crop images in just a few clicks. This guide will cover the various methods you can utilize to crop images in Word documents.
Use the Standard Crop Tool
The fastest way to perform basic cropping is with the standard crop tool:
- Select the image you wish to crop.
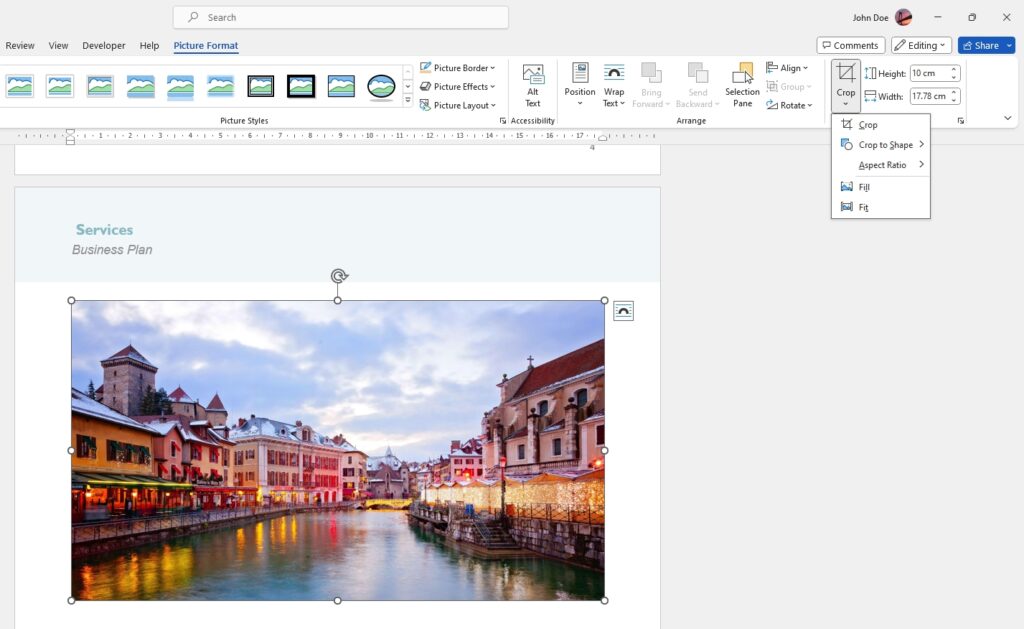
- Go to the Picture Format tab on the ribbon.
- Click the Crop button.
- Drag the round handles on the image borders inward or outward to adjust cropping.
- Click the Crop icon again to remove the cropped parts and keep only the selected area.
The crop handles allow you to trim all four sides at once or each side independently for precise control. You can undo and redo crops until you find the perfect framing.
Crop Images to Specific Shapes
Along with the standard crop which allows rectangular crops, Word also provides options to crop images into predefined shapes:
- Select the image.
- Go to the Picture Format tab.
- Click Crop > Crop to Shape.
- Choose a shape like Oval, Triangle, Arrow, or Parallelogram to instantly crop the image to that form.
Cropping to a shape can create interesting image effects and layouts. It works well for accenting a key point or highlighting a central focus area.
Crop Images to Set Aspect Ratios
Another useful cropping choice is using fixed aspect ratio crops:
- Select the image.
- Go to the Picture Format tab.
- Click the Crop Aspect Ratio icon.
- Select one of the preset ratios like 16:9 or 4:3.
Cropping to a standard aspect ratio ensures the image dimensions match common formats used for monitors, printing, social media, and more. This helps images appear correctly scaled across different media.
Tip: You can also define a custom aspect ratio instead of using a preset to meet specialized needs.
Save Cropped Images
By default, the cropped parts of an image are only hidden in Word, not permanently deleted. To save a cropped image and remove trimmed sections:
- Double-click the cropped image.
- In the Format tab, go to Compress Pictures.
- Check the box for Delete cropped areas of pictures.
- Click OK to compress the image and apply crops.
Saving the cropped version reduces file size by removing unseen areas. This is essential for maintaining small file sizes in documents intended for distribution and printing.
Cropping Tips and Tricks
Follow these tips to master image cropping in Word:
- Use high resolution source images for best print quality results from cropping. Low resolution images become pixelated when enlarged after tight cropping.
- Avoid aggressively cropping into the main focal points of an image. Always preserve the key subject matter.
- Compare file sizes before and after cropping to evaluate effectiveness in reducing file size. More aggressive crops lead to greater reductions.
- The crop handles automatically snap to whole pixel increments as you drag for the cleanest edges.
- Use Undo liberally while cropping to easily try different crop areas.
- Crop stylistically to match the image layout to other design elements on the page.
When to Crop Images in Word
Cropping can greatly enhance images embedded in Word documents. Consider cropping photos and illustrations to:
Draw Attention to Key Elements
Cropping removes clutter and isolates the most important parts of an image. For example, cropping a group photo to feature just one central person that is the focus of the accompanying text.
Benefit: Highlights key message visually.
Balance Space
Cropping to a specific shape can fill awkward empty areas on the page. Using circular or diagonal cropped images adds visual interest to blank spaces.
Benefit: Improves overall document design and layout.
Match Layouts
Cropping to the same aspect ratio creates consistent image sizes. This provides alignment between different photos and graphics.
Benefit: Creates cohesive formatting.
Fit Artwork into Infographics
Infographic elements often need images sized to precise dimensions. Cropping provides precision when images need to fit specific graphic templates.
Benefit: Enables custom infographic creation.
Reduce File Sizes
Removing unused background areas significantly decreases file sizes, especially for high resolution images. This cuts down on storage needs and speeds up loading.
Benefit: Optimizes document size and performance.
Reframe Subjects
Cropping controls the area the viewer sees, which completely changes context. Cutting out extra foreground or background refocuses the frame on key details.
Benefit: Changes message or story being told.
Cropping Tool Options in Word
Word provides versatile and easy-to-use cropping functions accessible right within the application interface:
Standard Crop Tool
- Crops images to custom rectangular areas
- Drag handles on all four sides
- Fastest method for basic cropping needs
Crop to Shape
- Choose from predefined shapes like circles and triangles
- Creates interesting graphical effects
- Ideal for accenting specific subjects
Crop Aspect Ratio
- Crops images to standard dimensions like 4:3 or 16:9
- Ensures proper scaling across different media
- Maintains consistency for multi-image documents
Compress Pictures
- Permanently removes cropped areas to reduce file size
- Critical step for preparing distribution-ready files
- Be sure to save cropped version for maximum space savings
Conclusion
Cropping is an essential skill for perfecting the use of images in Microsoft Word documents. Taking the time to crop photos and illustrations allows you to hone in on the most important visual details and cut out anything extraneous.
Cropping tools like the crop handles and crop to shape give you precise control to finesse images to best showcase each element on the page. Mastering the techniques for cropping and compressing images will vastly improve the quality of image-heavy documents you create in Word.
Whether you need to isolate key subjects, create visual harmony, optimize file performance, or reframe the story, cropping allows you to transform images to match your messaging needs. With a refined creative eye and Word’s user-friendly cropping features, you can produce perfectly framed images that capture attention and communicate visual stories effectively.


