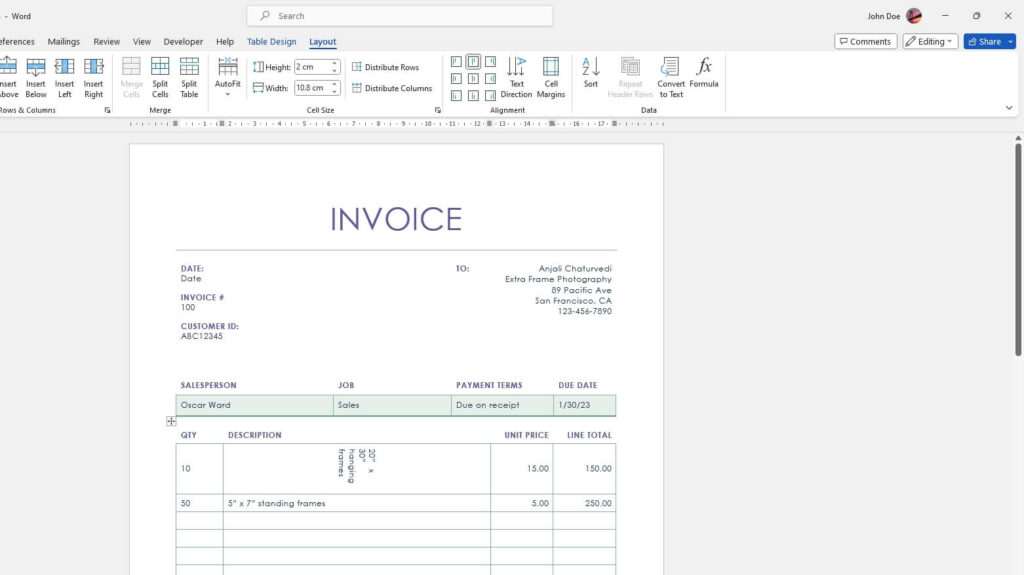
Creating vertical text in a Microsoft Word table allows you to fit more text in narrow table columns or draw attention to specific cells. While Word does not have a built-in vertical text option, you can rotate text 90 or 270 degrees in a table cell to make it vertical.
In this comprehensive tutorial, you’ll learn two easy methods for making text vertical in Word tables:
- Using the Text Direction command
- Typing text into a rotated text box
Both methods work well, so choose the one that best fits your needs. Let’s get started!
Method 1: Use the Text Direction Command
The easiest way to make text vertical in a Word table is by using the Text Direction command. Here are the step-by-step instructions:
Insert a Table
- Click where you want to add the table and go to the Insert tab
- Click the Table button and select the number of rows and columns needed
- Click inside a cell to start typing text
Change Text Direction
- With your cursor in the table cell, go to the Layout tab
- Click the Text Direction button (under Alignment)
- Select either Rotate all text 90° or Rotate all text 270°
That’s it! The text in the cell will now display vertically.
Tip: To return the text to a horizontal orientation, click the Text Direction button again and choose Horizontal.
The benefit of using Text Direction is its simplicity. With just a few clicks, you can quickly orient table text vertically without any complicated formatting.
Method 2: Use a Rotated Text Box
You can also create vertical text by typing into a rotated text box inserted inside a table cell. Here is how:
Insert a Table
- Click where you want the table
- Go to the Insert tab
- Click the Table button
- Select the number of rows and columns needed
Insert a Text Box
- Click inside the table cell
- Go to the Insert tab
- Click Text Box > Draw Text Box
- Draw a text box inside the cell
Rotate the Text Box
- With the text box selected, go to the Format tab
- Click Text Direction (under Text)
- Choose either Rotate all text 90° or Rotate all text 270°
Now just click inside the rotated text box and start typing! The text will orient vertically.
Using a rotated text box gives you more control over text formatting. And if needed, you can resize or reposition the text box within the cell.
Tips for Vertical Text in Tables
Here are some handy tips when working with vertical text in Word tables:
- To align vertical text, use the alignment buttons on the Layout tab
- Resize row height to fit vertical text by dragging the bottom of the row
- Make sure any vertical text you add fits entirely within its cell
- Use a narrow table column to contain long vertical text
- Rotate multiple cells by applying text direction to the entire table
Common Questions About Vertical Text
Here are answers to some common questions about orienting text vertically in Word tables:
How do I make an entire paragraph vertical?
To orient an entire paragraph vertically, type the text into a vertical text box instead of directly in the table. The text box allows multiple paragraphs to display vertically.
Can I create vertical text outside a table?
Yes, add vertical text anywhere by typing inside a rotated text box. Just remember to resize the text box height to fit the text.
How do I create vertical text on one line?
Use a narrow, single-cell table column for vertical text you want on one line. Make sure the cell height fits the text.
Why does my vertical text not display properly?
If vertical text appears cut off or overlapped, expand the row height to allow the text to display fully. Consider widening the column as well.
Final Tips for Great Vertical Text
With the right technique, creating vertical text in Word tables is easy. Just remember these final bits of advice:
- Experiment with both methods to see which vertical text approach you prefer
- Make sure row heights suit the length of vertical text
- Align text properly so it displays cleanly and crisply
- Use a text box for more formatting options
So try making your Word tables more distinctive and compact with vertical text. Both methods work great, so pick the one that best fits your document needs.


