A hanging indent is a paragraph formatting style where the first line starts at the left margin and subsequent lines are indented in from the margin. Hanging indents are commonly used in bibliographies, references pages, outlines, and other places where a list of information needs to be formatted so it’s easy to scan visually.
In this tutorial, you’ll learn two easy methods for creating hanging indents in Microsoft Word so you can professionally format documents requiring this style.
Method 1: Use the Paragraph Dialog Box
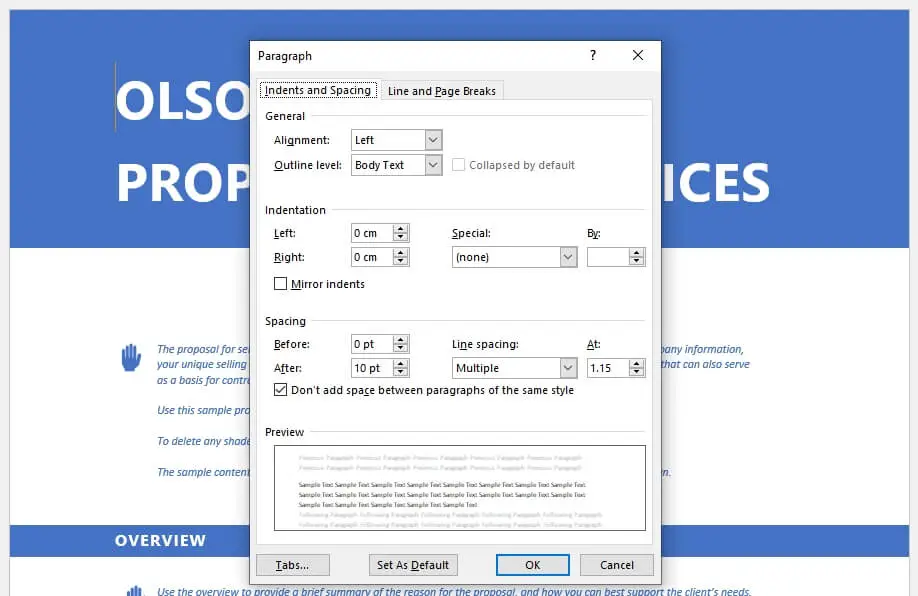
The Paragraph dialog box gives you precise control over spacing and indentation settings. Here are the steps to create a hanging indent using this method:
- Select the text you want to apply the hanging indent to. You can select an entire document, single paragraphs, or just parts of paragraphs.
- Click the “Home” tab and find the “Paragraph” section. Click the small arrow in the bottom right corner. Paragraph Section
- The Paragraph dialog box will open. Under “Indentation”, click the arrow next to “Special” and choose “Hanging”. Hanging Indent Selection
- You can use the “By” input field to specify the exact indentation amount, such as 0.5 inches.
- Click OK and the selected text will now have a hanging indent applied.
The advantage of this method is it gives you precise control over the indentation amount. The disadvantage is it takes more clicks to access the Paragraph dialog box.
Method 2: Use the Ruler
The ruler method is faster if you want to quickly apply a standard 0.5 inch hanging indent.
- Enable the ruler by clicking the “View” tab and checking the “Ruler” box. Ruler
- Select the text you want to indent.
- Click and drag the bottom triangle on the ruler to the 0.5 inch mark. Ruler Triangle
- The selected text will now have a 0.5 inch hanging indent.
The advantage here is speed and simplicity. The disadvantage is lack of precision control compared to the dialog box.
Removing Hanging Indents
To remove hanging indents applied with either method:
- Select the text with the existing indent.
- Open the Paragraph dialog box.
- Under “Indentation”, change “Special” to “None”.
The text will now return to having a standard indent or no indent, depending on your defaults.
Hanging Indents for Numbered Lists
You can also apply hanging indents to numbered lists to give them a more structured, outlined appearance:
- Select the entire numbered list.
- Open the Paragraph dialog box.
- Choose “Hanging” under “Special”.
- Set the “By” field to your desired indent.
- Click OK.
The numbers will now align vertically while the text is indented in a hanging style.
Troubleshooting Issues
Here are solutions for common issues when working with hanging indents:
- Indent moves with text: Select the text and choose “None” under “Special” to remove manual indent formatting.
- Indent doesn’t apply properly: Try removing existing manual formatting first. Ensure text is left-aligned, not centered or right-aligned.
- First line keeps indenting: The text may have a standard first-line indent already applied. Choose “None” under “Special” then reapply the hanging indent.
Taking a methodical approach helps resolve most problems!
Recap and Next Steps
You should now feel comfortable creating hanging indents in Word documents using the Paragraph dialog box or ruler.
Some next things to explore:
- Create your own paragraph style presets with hanging indent options already configured to save time formatting multiple documents
- Use hanging indents in your next research paper, report, outline, or bibliography
- Dive deeper into advanced indentation formatting options
I hope you found this tutorial on how to create hanging indents in Word helpful! Let me know if you have any other questions.


