Adding headings to your Google Doc is an easy way to organize your content and make it more readable. Headings break up blocks of text, allowing readers to easily scan for key points or sections.
In this article, I’ll walk you through everything you need to know about adding and customizing headings in Google Docs.
Why Use Headings
Here are some of the key reasons you should use headings in your Google Docs:
- Improve scannability. Headings allow readers to quickly identify what each section is about. This improves the scannability of your document.
- Organize information. Headings naturally divide your document into sections and subsections. This makes the structure and organization clearer.
- Enhance accessibility. Headings create an outline of your document that screen readers for the visually impaired can navigate through.
- Boost SEO. Heading tags (
<h1>,<h2>) are interpreted by search engines. Using them appropriately can improve your content’s findability.
Headings Overview
Google Docs has 6 heading levels to choose from:
Heading 1
Heading 2
Heading 3
Heading 4
Heading 5
Heading 6
The highest heading level is Heading 1. As you go down the list, the headings get smaller and less prominent.
- Use Heading 1 sparingly. This should be reserved for the main title or section titles.
- Stick to 2-3 heading levels. Most documents only need 2 or 3 heading levels to be structured effectively. More than that becomes confusing.
Now let’s look at how to add and customize headings.
Adding a Heading
Adding a heading is simple:
- Place your cursor where you want the heading. This may be above a section of text you want to title.
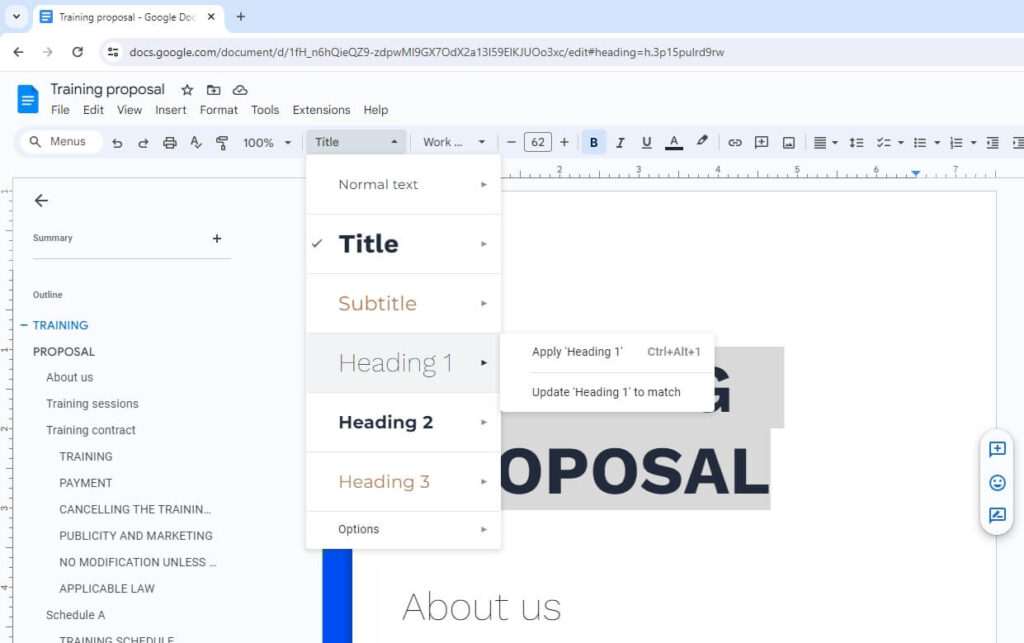
- Open the heading dropdown. On Windows/ChromeOS: Go to Format > Paragraph styles. On Mac: Go to Format > Paragraph > Styles.
- Choose your heading level. Select the appropriate heading style from the dropdown.
And that’s it! The text where your cursor is located will change into the selected heading style.
Keyboard Shortcuts
For even faster formatting, use these handy keyboard shortcuts:
- Heading 1: Ctrl + Alt + 1 (Windows/ChromeOS) or ⌘ + Option + 1 (Mac)
- Heading 2: Ctrl + Alt + 2 (Windows/ChromeOS) or ⌘ + Option + 2 (Mac)
- Heading 3: Ctrl + Alt + 3 (Windows/ChromeOS) or ⌘ + Option + 3 (Mac)
- And so on up to Heading 6.
Customizing Headings
You have full control over how your headings look in Google Docs. Let’s explore those formatting options:
Change Font
To change the font family and size of a heading:
- Select the heading text.
- Open the font dropdown (Format > Font)
- Choose your desired font family and size.
Pro tip: Keep your headings consistent by applying your desired font styling as a paragraph style that you can easily reuse.
Bold and Italics
Toggle bold or italics formatting on any heading by selecting it and clicking the B or I buttons in the toolbar.
Text Color
You can make your headings stand out with custom text colors:
- Select the heading.
- Click the text color palette icon.
- Choose your desired heading text color.
Align Text
Headings can be aligned left, centered, or right:
- Select the heading.
- Click the align left, center, or align right icon.
Tip: Most headings look best left-aligned, but centered titles can look nice too.
Change Background Color
Adding a colored background is a great way to make your headings pop:
- Select the heading text.
- Click the “highlight color” icon.
- Choose a background color from the palette.
And that covers the basics of working with headings in Google Docs! Apply these tips to add organized, easy-to-scan structure. Let me know if you have any other questions!


