Attaching files in Microsoft Word allows you to embed external files like PDFs, images, charts, or other documents directly into your Word document. This keeps everything neatly organized in one place and allows readers seamless access to supplementary materials.
Here is a step-by-step guide on how to attach a file in Word:
1. Open the Word document
Open the Word document where you want to embed an attachment. You can either create a new blank document or open an existing file.
2. Position your cursor
Click your cursor at the point in the document where you want the attached file to be inserted.
3. Go to the Insert tab
In the top navigation bar, click on the Insert tab. This is where you will find the tools to embed a file.
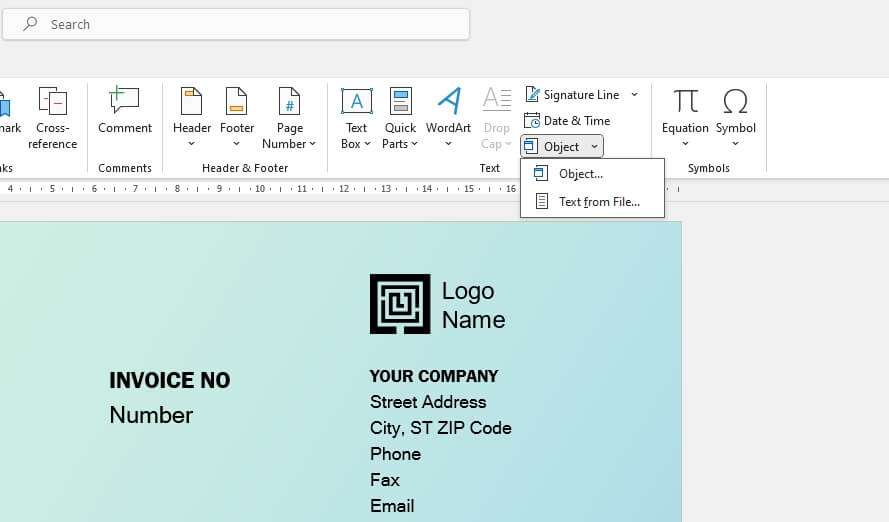
4. Click on Object
In the Text group of the Insert tab, click on Object. A drop-down menu will appear.
5. Select From File
From the Object drop-down menu, choose From File. This will open a new dialog box allowing you to browse your files.
6. Navigate to and select your file
In the dialog box, navigate to the file you want to embed. Select the file and click Open.
💡 Pro Tip: Hold down the CTRL key to select multiple files to attach at once.
7. Choose display options
After selecting your attachment, you have options on how it will appear in the document. Check or uncheck the boxes for:
- Link to File: Attaches the file as a link instead of embedding it.
- Display as Icon: Displays the attachment as an icon rather than showing the file contents.
8. Click OK
Once you’ve selected your preferences, click OK to embed the attachment in your Word document.
💡 Pro Tip: To edit the icon or other display options later, right click on the object and choose Size and Position.
9. Save your Word document
Don’t forget to save your Word document to preserve your newly embedded attachments!
And that’s it! By following these simple steps, you can organize supplemental files like PDFs, images, charts, media, or other Word documents by embedding them directly into your main Word file.
Tips for Working with Attachments
Here are some additional pointers for working with attachments in Word:
Edit Attachments in Context
Double click on an attached file icon in your document to quickly open the file in its native application for editing. Your changes will be saved directly back to the version stored in your Word doc.
Add a Caption
Select the attachment, go to the References tab, and click Insert Caption to add a title or explanatory text. Captions can help readers better understand the purpose of your attachments.
Change Icon Shape or Color
To make attachments stand out, right click on them and select Size and Position. Here you can choose a different icon image or tint attachments different colors.
View File Details
Right click on an embedded object and choose Size and Position to see details like file size, path, date created and more useful information about attachments.
Extract Attached Files
Go to the File tab and choose Info > Manage Document > Extract Embedded Files to save copies of attachments to your computer or a cloud storage service.
By mastering these tips for editing, formatting and managing attachments in Word, you’ll have much better control over supplemental files embedded in your documents.
So next time you’re creating a report, proposal, manual, or other document, consider attaching relevant files for your readers! Attaching files directly into your Word documents saves readers clicks and creates a more connected, enriched document experience.


