Welcome! I’m excited to walk you through the easy process of adding bookmarks in Google Docs. Bookmarks allow you to quickly navigate to specific spots in your document. This can save you tons of time, especially if you have lengthy Docs.
I’ll share step-by-step guidance along with helpful screenshots so you can master bookmarks. Whether you’re a student working on an essay, a marketing pro with a long proposal, or anyone who uses Docs, bookmarks are a must-have tool for efficiency.
Let’s get started!
Why Use Bookmarks?
Before we dive into the how-to, let me quickly cover why bookmarks matter:
Bookmarks create a clickable table of contents for quick access to sections. Instead of tediously scrolling through pages, you can jump.
They make collaborating with teammates easier. You can tell others to check a bookmarked point.
Bookmarks are great for referencing pieces of text frequently. Keep key data easy to rediscover.
No more hunting for crucial spots like methodology sections or data charts—bookmarks pinpoint them.
The bottom line is that adding bookmarks can seriously improve your productivity. They make life with long or complex Docs much smoother.
How to Add a Bookmark in Google Docs
Ready to get bookmarking? Adding these clickable shortcuts takes just seconds.
Follow these simple steps:
- Open your Google Doc and click where you want your bookmark.
- Select the text you want to bookmark. You can bookmark a heading, paragraph, table, image—anything.
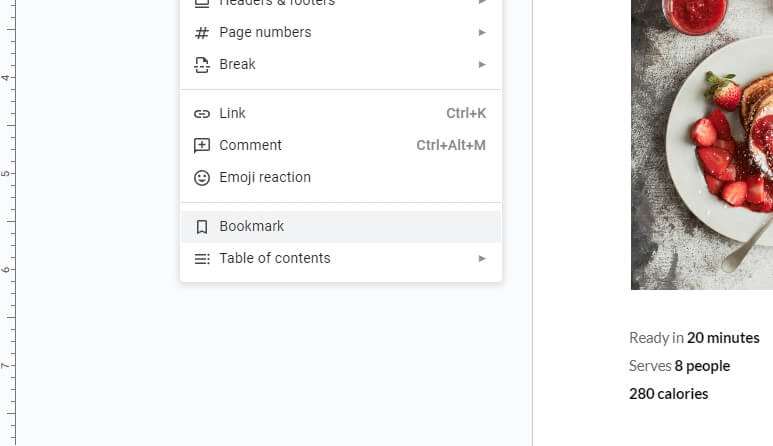
- Click Insert in the Docs toolbar then select Bookmark. Image
- In the Bookmark pop-up, name your bookmark. Make sure names are descriptive, for example, “Key Metrics” or “Q3 Data.”
- Click Done.
And that’s seriously all there is to it! The bookmark instantly appears in the right sidebar.
Now whenever you click your bookmark, you’ll zip straight to the bookmarked content. It’s like a hyperlink to that spot in your document.
Pro tip: You can add multiple bookmarks to the same content if helpful. Maybe bookmark a table by its name and chapter number.
Accessing and Managing Bookmarks
Now that you know how to add bookmarks, let’s cover how to access and organize them:
To view bookmarks, simply open the right sidebar. Here you’ll see a vertical list of bookmarks that acts as a clickable table of contents.
To rename a bookmark, right click it in the sidebar and select Rename.
To delete a bookmark, right click it and choose Delete bookmark.
To reorder bookmarks, click and drag them up or down in the sidebar. Arrange by priority!
To minimize sidebar clutter, you can create bookmark folders. Right click in the sidebar and select Add new folder. Then organize bookmarks into different categories and folders.
That covers bookmark basics! Let’s move onto some pro-level tactics.
Advanced Bookmark Tips & Tricks
Want to take your bookmark skills to the next level? Here are my top power-user tips:
Add a bookmark to the current cursor position by right clicking and choosing Add Bookmark. No need to select text first.
Open a document straight to a bookmark by right clicking it and selecting Open document at this bookmark.
Link between documents by bookmarking the same text across files. Then quickly jump between connected files.
Bookmark the same content multiple times by giving each identical bookmark a unique name. Helpful for recurring important sections!
Keyboard shortcuts allow you to insert and navigate bookmarks without touching your mouse:
- **Ctrl + Shift + 1** adds a bookmark
- **Ctrl + 1** opens the bookmark sidebar
- **Ctrl + Shift + N** jumps to the next bookmark
- **Ctrl + Shift + P** jumps to previous bookmark
And that wraps up my top bookmarking pro tips!
Recap: Key Takeaways
Let’s do a quick recap of bookmark basics:
- Bookmarks make navigating long Docs much faster. Simply click to jump to bookmarked spots.
- To add a bookmark, select text then click Insert > Bookmark. Name it something descriptive.
- Manage bookmarks using the right sidebar. Rename, reorder, delete, or group into folders here.
- Advanced tricks like linking files, opening to bookmarks, and keyboard shortcuts boost efficiency further.
I hope this tutorial gave you the complete guide to mastering bookmarks in Google Docs! Now you’re ready to start bookmarking like a pro.
Go ahead, try adding some bookmarks to your Docs! I think you’ll be amazed by how much time and hassle they save once put into practice.
Let me know if you have any other questions. Happy bookmarking!


